OTR Microwave Hood Fan Not Working: Repair Guide
Over-the-range (OTR) microwave hood fans handle cooking fumes, steam, and odors through grease filters and exhaust motors. When they stop working, odors linger and kitchen air quality suffers. This guide covers safe diagnostics and fixes, from simple cleaning to motor replacement.
Safety Precautions Before Starting
Unplug the microwave from the wall outlet or turn off the circuit breaker. Wait 5 minutes for capacitors to discharge. OTR units mounted above stoves carry high-voltage risks even when off—death from electric shock is possible. Wear insulated gloves; never bypass safety interlocks. Work with two people for cabinet removal (25-40kg unit).
Tools needed: Phillips/Torx screwdriver set, multimeter, needle-nose pliers, flashlight, step ladder.
Step 1: Basic Functionality Checks (5 Minutes)
Verify Controls
Press Vent Fan button—check all speeds (low/med/high). Some models auto-activate during cooking; toggle settings. Reset by unplugging 5 minutes. Test light operation (separate circuit).
Power Cycle
Turn breaker off 60 seconds, then on. Faulty touchpad relays cause 20% of fan failures—reset often resolves.
Step 2: Clean/Inspect Grease Filters (10 Minutes)
70% of fan issues stem from clogged grease filters blocking airflow.
-
Locate filters under microwave (metal mesh, spring clips)
-
Slide out (push release tabs or lift)
-
Inspect: Heavy grease buildup stalls motors
-
Clean: Dishwasher safe OR hot soapy water + degreaser
-
Dry completely, reinstall firmly
-
Test fan: Should spin freely with reduced resistance
Replace if rusted, bent, or permanent grease coating (KSh 1,000-3,000).
Step 3: Check Damper Assembly (15 Minutes)
Damper flaps prevent backdrafts—stuck ones block fans.
-
Access: Remove filters, shine flashlight into exhaust chute
-
Manual test: Flap should swing freely both directions
-
Clean hinges—grease stiffens mechanisms
-
Replace if cracked/broken (KSh 2,500-5,000)
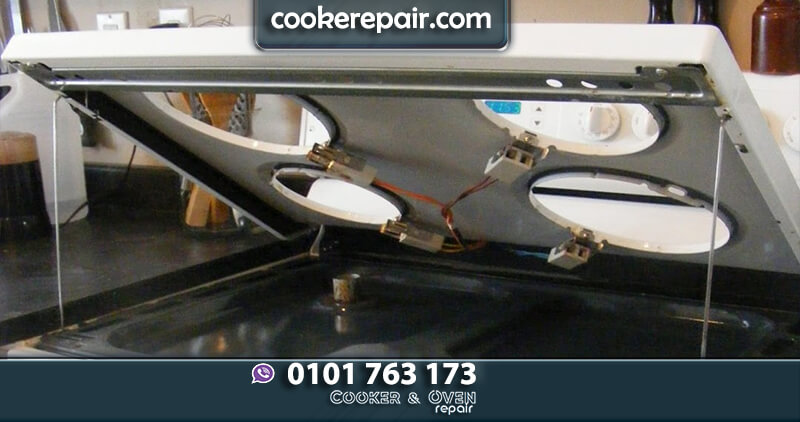
Step 4: Test Fan Motor (30-45 Minutes – Partial Disassembly)
Full OTR removal optional for initial test.
-
Remove cabinet top (4-6 exterior screws)
-
Locate fan (rear/top, 10-15cm diameter)
-
Manual spin: Blades should rotate smoothly by hand
-
Multimeter test:
-
Set to Ω (ohms)
-
Probe motor terminals → 20-50Ω continuity = good
-
OL/infinite = dead motor
-
Stuck blades = bearings seized (common 3-5 years).
Step 5: Full Fan Motor Replacement (60-90 Minutes)
Requires OTR removal:
1. Support unit with helper (remove mounting screws)

2. Disconnect vent duct

3. Unplug wiring harness (photo connections)

4. Remove 4-6 fan housing screws

5. Extract motor + blade assembly

6. Install new OEM motor (torque blades gently)

7. Reverse steps, test all speeds
Cost: KSh 4,000-8,000 (motor + labor if pro).
Troubleshooting Decision Tree
Common Causes by Age
When to Call Professionals
STOP DIY if:
-
Motor sparks/seized
-
Burning smell (wiring)
-
Control panel dead
-
No multimeter access
Pro service (KSh 3,000-10,000) includes:
-
Full electrical safety test
-
OEM parts warranty
-
Microwave leakage check
-
6-12 month guarantee
Prevention Schedule
-
Weekly: Wipe filters
-
Monthly: Degrease + damper check
-
Yearly: Motor continuity test
CookerRepair.com handles OTR hood repairs with same-day availability. Clogged filters cause 70% failures—clean first, call pros for motors. Safe kitchens save lives.