Repairing Cooker Knobs, Switches, and Controls: A practical guide to diagnosing and fixing common faults with cooker knobs, switches, and control modules — aimed at DIYers and service technicians who want safe, reliable, and cost-effective repairs.
PAGE CONTENT
Why cooker controls fail
Cooker control problems usually stem from mechanical wear, heat exposure, grease and grime buildup, electrical faults, or user damage. Knobs wear down or crack, switch contacts burn or corrode, and electronic control modules can fail due to overheating, moisture ingress, or voltage spikes. Understanding the root cause narrows down whether you need a simple replacement knob, a switch repair, or a more involved control board service.
Tools and safety essentials for Repairing Cooker Knobs, Switches, and Controls
Insulated screwdrivers and nut drivers.
Multimeter (AC/DC voltage, continuity).
Contact cleaner (electronic grade) and isopropyl alcohol.
Small needle-nose pliers and tweezers.
Soldering iron and desoldering braid (for board-level repairs).
Replacement parts: knobs, microswitches, potentiometers, terminal blocks, control board (if needed).
Protective gloves and eye protection.
Non-contact voltage tester or socket tester.
Always isolate power: switch off the cooker at the isolator and confirm with a multimeter. For gas cookers, turn off gas supply when working near valves or igniters.
Common parts and how they fail
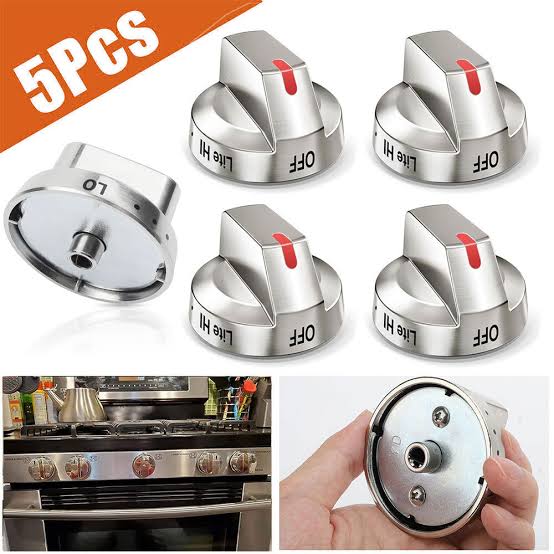
Knobs: Plastic knobs crack, split bosses shear off, or the internal spline wears causing slipping.
Mechanical switches (rocker or toggle): Contacts pit or carbonize, causing intermittent operation or no connection.
Microswitches (for doors, selectors): Spring failure or contact wear; often cheap and modular.
Potentiometers and rotary selectors: Track wear causes noisy control or dead zones.
Electronic control boards (timers, touch controls): Faulty relays, blown capacitors, damaged traces, or failed components from thermal stress.
Ignition switches and spark modules (gas cookers): Worn electrodes, faulty switches, or shorted ignition transformers.
Diagnostic steps — quick checklist
Visual check: Look for melted plastic, burn marks, corroded terminals, or grease accumulation.
Power confirmation: Verify supply at the cooker and at the control input.
Knob-test: Remove knob, manually operate shaft or switch; if control works without knob, replace knob only.
Continuity and resistance: Use multimeter to test switch continuity and potentiometer resistance range.
Swapping: If there are identical parts (e.g., same knobs/switches on multiple burners), swap to isolate fault.
Board inspection: Check for bulging or leaking capacitors, scorch marks, or cracked solder joints.
Functional test: Reassemble partially and test operation before full reassembly.
Replacing a knob
Remove: Grip knob and pull straight off. If stuck, use a pulling tool or gently lever with a flat screwdriver protected by cloth.
Identify: Note spline count/type or shaft profile (D-shaft, splined, round with set-screw).
Clean: Wipe the shaft and inner knob with isopropyl alcohol to remove grease.
Replace: Fit correct replacement knob; for metal shaft with set-screw, tighten screw to secure.
Test: Operate all positions to ensure proper fit and electrical response.
Repairing or replacing mechanical switches
Access: Remove control panel screws and carefully pull assembly forward to access switches and wiring.
Label wiring: Photograph or label terminals before disconnecting to ensure correct reassembly.
Test: With power off, test switch continuity in different positions. With power on (careful), confirm switch supplies expected voltage.
Replace: Remove retaining clips or screws, free switch, and install new unit. For modular switches, soldering may be unnecessary — use push-fit or spade terminals.
Clean contacts: For slightly corroded contacts, use contact cleaner applied to the switch while operating it several times.
Fixing potentiometers and rotary selectors
Symptoms: Scratchy noise, dead zones, inaccurate temperature settings.
Cleaning: Spray contact cleaner into the pot housing while turning shaft through full range. Work the pot to distribute cleaner.
Replace: If cleaning doesn’t help or physical damage exists, replace the pot. Note the resistance value and taper (linear/log) and match the part.
Calibration: After replacement, confirm the control curve by testing temperature response or reading resistance values at endpoints.
Electronic control board troubleshooting
Safety: Because mains voltages and stored capacitors are present, only experienced technicians should perform board-level repairs.
Visual inspection: Look for bulging capacitors, cracked components, burned areas, or lifted traces.
Component testing: Use multimeter to test diodes, resistors, fuses, and check capacitor ESR (if you have the tool).
Common fixes: Replace bulging capacitors, reflow cracked solder joints, replace failed relays or optocouplers.
When to replace board: If multiple components fail or the microcontroller/firmware area is damaged, board replacement is usually more cost-effective.
Firmware/lock issues: Some modern cookers lock controls after errors; check manufacturer instructions for reset procedures before replacing hardware.
Ignition and spark issues (gas cookers)
Symptom patterns: Clicking with no spark, weak spark, or spark at wrong burner.
Inspect electrodes: Clean electrode tips and ensure proper gap (typically 2–3 mm) and correct positioning relative to burner ports.
Switch and wiring: Check the ignition switch or microswitch and wiring to the spark module for continuity.
Spark module: Test the high-voltage output if you have appropriate equipment; otherwise, swap with a known-good module if practical.
Safety: Avoid using gas while testing—ensure proper ventilation and gas off when working close to ignition components.
Preventive maintenance to extend life
Regular cleaning: Remove knobs and wipe shafts and controls monthly to remove grease and grime.
Avoid abrasive cleaners near controls; use mild detergent or isopropyl alcohol.
Use silicone lubricant sparingly on plastic shafts to reduce wear; avoid petroleum-based oils that degrade plastics.
Keep vents and cooling passages clear on electronic control modules to reduce overheating.
Fit protective boots or seals for outdoors or heavy-grease cooking environments to keep moisture and oil away from switches.
Parts sourcing and cost considerations
Knobs and switches are low-cost and widely available from appliance spare-part suppliers, online marketplaces, and local repair shops.
Electronic control boards are the most expensive items; verify model numbers and part codes before ordering.
Use genuine parts for safety-critical items (ignition systems, thermostats, safety cutouts). Aftermarket parts are acceptable for non-critical cosmetic components like knobs, but ensure fit and material compatibility.
For small businesses or service technicians, stocking common knobs, microswitches, and terminal blocks reduces repeat trips and turnaround time.
When to call a professional for Repairing Cooker Knobs, Switches, and Controls
You should call a qualified appliance technician if:
The control board shows severe damage or you lack the tools to test/replace components.
You encounter mains wiring or live-voltage work you’re not trained for.
Gas valve or regulator parts need replacement.
The cooker has intermittent faults that suggest complex wiring or firmware issues.
Professionals have insulation testers, high-voltage tools for ignition systems, and access to genuine replacement boards.
Troubleshooting flowchart (quick)
Knob slips or spins -> remove knob; inspect shaft and boss -> replace knob or shaft adapter.
Entire zone not powering -> check power at terminal block -> test switch continuity -> replace switch if open.
Intermittent operation -> check wiring harness and solder joints -> reflow or secure connectors.
Scratchy or dead rotary control -> clean or replace potentiometer/rotary encoder.
Board errors or locked panel -> attempt reset per manual -> inspect board for visible damage -> replace board if needed.
Repairing cooker knobs, switches, and controls is often a straightforward, low-cost way to extend appliance life and avoid full replacements. Basic faults are mostly mechanical or contamination-related and can be fixed with simple tools and a multimeter. Electronic failures require more care: balance repair vs replacement based on damage, cost, and safety
Faulty cooker controls — knobs that won't turn, switches that stick, or digital panels that don't respond — are a common but often underestimated repair need.
| Control Type | Common Fault | Fix |
| Rotary knob | Loose or won't turn | Knob or shaft replacement |
| Ignition switch | No spark | Switch replacement |
| Digital panel | Unresponsive buttons | Control board repair |
| Selector dial | Sticks between settings | Internal mechanism cleaning |
Because cooker controls connect directly to the thermostat and ignition systems, a fault here can look like a heating problem when it's really just a worn switch or dial.
- Test each knob individually to isolate which control is faulty
- Check for visible cracks or looseness on knob shafts
- Note whether digital panel faults occur at specific button presses
- Avoid forcing stuck knobs, which can damage the internal shaft further
Replacing worn cooker controls is usually a quick, affordable fix compared to replacing an entire cooker, and it often resolves what seemed like a bigger fault. Struggling with unresponsive knobs or switches? Call 0723763173 or visit cookerepair.com for a quick fix. A technician can usually source matching cooker controls for most major brands, restoring full function without needing a whole new panel. Get your controls working smoothly again. Call 0723763173 or visit cookerepair.com.